IT'S BEEN A WHILE!

>> Wednesday, November 12, 2014

I know what you are thinking, "here we go again". But yes I have been laying low for quite some time now. I won't bore you with the details (Maybe at a later date), but I am excited for the future.
Stayed tuned for a new series from us called '30 days Homemade'. We will be exploring the world of making as much as possible by hand/homemade such as; condiments, desserts, and more so keep an eye out it is coming soon.
Here is a little peek at what I have been up to recently https://www.youtube.com/watch?v=fXIpWp6c0NA&list=UU0bnby6fFdc769pd5ZfgIlQ
ENJOY!

Read more...

HALLOWEEN PARTY GAMES PART 2

>> Friday, October 26, 2012

ZOMBIE BOWLING


Our next game is Zombie bowling! In keeping up with keeping cost down, we will be making our own.   Pay no attention to the missing baseboards (my lame attempt at a wizard of oz quote) We just finished painting and haven't had time to put the baseboard on.

So let's get started:
We decided to do 6 pins instead of 10.
So gather the amount of plastic bottles you need of various sizes.

Put a few beans (sand/rocks) in the bottom of the bottles, to balance them out so they won't be top heavy.
I randomly stuffed the rubber gloves so that the fingers would be different shapes/sizes and pointing in different direction, next put the gloves on the bottles.
Now, let's paper mache (yup, I am at it again!)
Do 2 layers from the bottom up to the "wrist" area and then 1 layer on the hands (again, you don't want them to be top heavy)
 Paper mache paste: I use 1 part flour to 1 1/2 part water respectively ( make it just a little thicker than elmers glue) it will thicken as it sits so don't go to thick.


 Here they are all ready for paint!
I only had a dark brown spray paint, so that is what I used.
Once the paint is dry, now it is time to zombie them up!
Get creative and have fun.
Make them as gross as you want!


As for the bowling ball, we are going with some pumpkins that we paper mached a few years ago.
Here is the link if you wanna see the pics: http://www.blogger.com/blogger.g?blogID=5912058616689460941#editor/target=post;postID=5886777788738880176

Have fun and Happy Halloween!
Jax

Read more...

HALLOWEEN PARTY GAMES PART 1

>> Thursday, October 25, 2012


We are hosting a Halloween party for my 9 y/o and her friends this year and trying to keep the cost down, so we made up games that we could make with items we already have in the house, so here is the first one:

PUMPKIN BEAN BAG TOSS


I made a paper template for the bean bags and used an old shirt, cut out 6 pieces to make 3 bean bags.


We had some fabric scraps to make the stems and we cut out 6 of those to make 3 stems.
I hand stitched them on 3 sides and then stuffed them with some of the scraps.

Don't worry about the open bottom because that will be sewn into the bean bag latter.


Next, pin the stem inside the 2 circles and pin the circles together the rest of the way.


Like this, now sew it up making sure to leave an opening wide enough (about 1 inch) to turn them right side out and also to fill with beans.


Here it is turned right side out.


Now it's time to put a face on it! We used tempera paint.  This is the part the kids love.
Once dry fill with beans and sew it shut.


Look at those cute faces..................
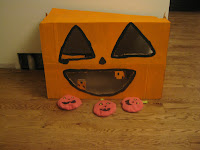
To finish it off, I got a box and cut out a pumpkin face (make sure the holes are big enough for the bean bags to fit through) and painted it!

Now, you have a pumpkin bean bag toss!!!!!

Enjoy, Jacqui


Read more...

  © Blogger template Simple n' Sweet by Ourblogtemplates.com 2009

Back to TOP